 Rui Carmo
A few weekends ago I decided to do some hardware stuff, both because I have been wanting to get into HomeKit in earnest (more on that later) but also because I have been working with Azure IoT Hub in a number of engagements and needed a portable setup that made it plain how simple (and cheap) it is to build cloud-enabled sensors.
I’ve been using a Raspberry Pi Zero W as a training/demo setup for a good while now (which reminds me, all the source code required for a demo setup with Azure Data Lake and Stream Analytics is up on this gist), but I wanted something much smaller that could be left unattended to provide telemetry for months.
Choosing the Hardware
Although I don’t write about that much, electronics was the reason I got into computing in the first place–it was my father’s main hobby, and he went for it in a big way; he’d make his own circuit boards, wind his own transformers for power supplies, design electronic car ignition circuits, etc. We even built a HeathKit oscilloscope1, and it was his foray into digital electronics that culminated in my getting a Sinclair ZX81 and eventually pursuing electronics in high school (and computer science from there).
And I’ve got an innate fascination for tiny, power-efficient hardware. Today, it feels like cheating to use a full-blown microcontroller to flash a few LEDs in sequence instead of going at it with a 555 for clock and a set of gates, but I guess that’s a sign of the times2.
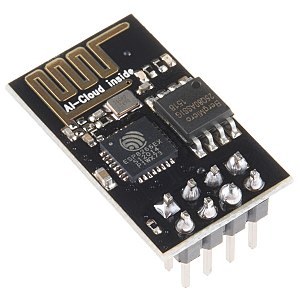
So the hardware I decided to use is the ESP-01, which is the tiniest (and arguably the most popular) ESP8266 variant out there, and I happened to have a few handy:
For sensors, I went with the DHT-11 temperature and humidity sensor, since it’s both the easiest thing to demo and exactly what I need for automating the AC and heaters over the upcoming winter (or what passes for it these days).
There is, however, a significant catch to the ESP-01–it only has 64K of instruction RAM, and 96 KiB of data RAM, which is much less than its beefier siblings, and way below the threshold where you can just shove the Azure IoT SDK into it and call it a day.
Runtimes
Cutting a long story short (and putting aside bleeding-edge stuff like esp-lisp that is likely only interesting to me), there are three main options out there for targeting the ESP8266:
- MicroPython, which is an old favorite of mine (I still have the original hardware it was developed for) and was ported to the ESP8266 three years ago.
- Lua atop NodeMCU, which is great for quick prototyping and saves you a lot of pain.
- C/C++ using the Arduino IDE, which is by far the most efficient of the lot but requires that special kind of stoicism that comes with, well, C.
All of them can be made to work on most ESP8266 devices, but the scenario I wanted posed a few challenges.
Talking to Azure IoT Hub
Getting down to brass tacks, regardless of the protocol you decide to use (HTTP, MQTT or AMQP), you need four things, in decreasing order of complexity:
- TLS support (which entails having an accurate clock, set by NTP)
- a working SHA256 HMAC implementation
- base64 decoding
- URL encoding
The first one is “just” transport, but the other three are essential for generating the SAS Token you need to authenticate an HTTPS request for IoT Hub.
These are usually a given in most modern runtimes, but I had challenges with all of them–for starters, neither MicroPython nor NodeMCU could be compiled to fit inside the ESP-01’s tiny flash with TLS support and enough extra functionality to be useful in other ways.
You can now quite easily build NodeMCU images in two ways: Either use this neat online build system or grab a Docker image with the prebuilt toolchain and point it to a copy of the source code (which was what I did for finer control, but the closest I got was a 528K NodeMCU integer build, which still wouldn’t fit).
Down To The Metal
Arduino was clearly the way to go here, so I started out by doing sensor readings and sending them out on my LAN via multicast (to make it easier to later integrate with HomeKit), which is trivial to do:
#ifdef DEBUG
    WiFiUDP Udp;
    // send payload as multicast packet
    Udp.beginPacketMulticast(MULTICAST_ADDRESS, MULTICAST_UDP_PORT, WiFi.localIP());
    Udp.write(payload.c_str());
    Udp.endPacket();
#endif
After a while, though, I came to realize that most of the libraries I needed were hopelessly outdated due to brittle dependencies and severly broken code–some of the sensor libraries for Arduino, for instance, would compile but fail to work due to C compiler vagaries or sheer RAM exhaustion, and stringing (pun intented) everything along in Arduino’s peculiar mix of C++ and plain C borders on the barbaric.
I decided to skip as much C++ as possible (a move that, as I would learn later, saved me just enough heap space to make things viable), and soon had a nearly working version–that kept failing on computing the SAS token.
Considering that I was the one who contributed the Python sample for the official docs, I was pretty sure it wasn’t my fault.
But then I started noticing (and fixing) a few other things: A little nuance regarding SAS token generation is that most of the examples out there do rather naïve URL escaping without taking into account “safe” characters, which works but has the irritating side effect of making it harder to compare implementations (by this time I was testing this alongside my minimal Go client for IoTHub, comparing things down to the hash level, so exact matches were important).
So I ended up implementing my own URL escaping in C (later converted to Arduino C++) that closely matches what you get in Go:
// Perform "safe" URL escaping, like the Golang and Python defaults
String urlEscape(String msg) {
    String safe = "ABCDEFGHIJKLMNOPQRSTUVWXYZabcdefghijklmnopqrstuvwxyz0123456789_.-~";
    String hex = "0123456789ABCDEF";
    String escapedMsg = "";

    for(int i=0; i < msg.length(); i++) {
        if(safe.indexOf(msg[i]) >= 0) {
          escapedMsg += msg[i];
        } else {
            escapedMsg += '%';
            escapedMsg += hex[(msg[i] & 0xF0) >> 4];
            escapedMsg += hex[msg[i] & 0x0F];
        }
    }
    escapedMsg.replace(' ', '+');
    return escapedMsg;
} // urlEscape
After making sure the encoding was 100% correct, I then realized that the SHA256 library I was using just had to be broken. Again, brittle, outdated libraries were to blame.
Squeezing Down Prior Art
As it happens, there is a nearly perfect solution out there–a full-blown, well implemented project that did almost exactly what I wanted, open-sourced by Dave Glover.
It targets the ESP8266, includes all the dependencies I needed, and I only found it completely by accident when I started Googling for sha256 arduino esp8266 (somehow, for me, it doesn’t even register when I search for azure iot hub esp8266, with or without arduino–so much for personalization, I guess).
However, it crashes rather spectacularly on the ESP-01, since it uses a set of C++ classes to abstract sensor models and does a fair bit of String manipulation, which quickly exhausts heap space–not a problem on the bigger boards Dave targeted, but untenable on the ESP-01.
But the SHA256 library he was using worked–so I changed my code to use that instead. However, by this time my code started crashing too, since the third sensor library I’d gone through was still too “fat” for the whole thing to fit in the ESP-01’s heap space, and Dave’s code didn’t help there.
Eventually, after much trial and error, I came across Mark Ruys’s DHT library, which is ancient in Arduino terms but enabled me to scrape past the heap limit with room to spare–and after a few hours of testing I decided that for a single sensor and demo purposes, I could spare the extra 4K and rewrite my C client in “proper” C++.
Power Management
However, I now had another problem–making the ESP-01 work on batteries for an appreciable length of time.
Again, there is plenty of literature out there on the various ESP8266 “sleep” modes, and the Arduino runtime supports toggling the “deep sleep” mode, in which the chip shuts down everything but the real-time clock, reducing the power draw to micro amperes instead of the hundred or so millis it bleeds out at full tilt.
There’s a catch, though, since that relies on having the RTC timer pin pull down the RST (reset) pin on the chip, effectively rebooting it. So far so good, except that on the ESP-01 the XPD_DCDC pin is not actually wired onto the PCB–it’s got a solder pad, but that leads nowhere.
Still, after some judicious filing of my smaller soldering iron and a couple of attempts (one of which, I’m sorry to report, was an utter failure), I was soon in posession of two ESP-01s with deep sleep enabled:
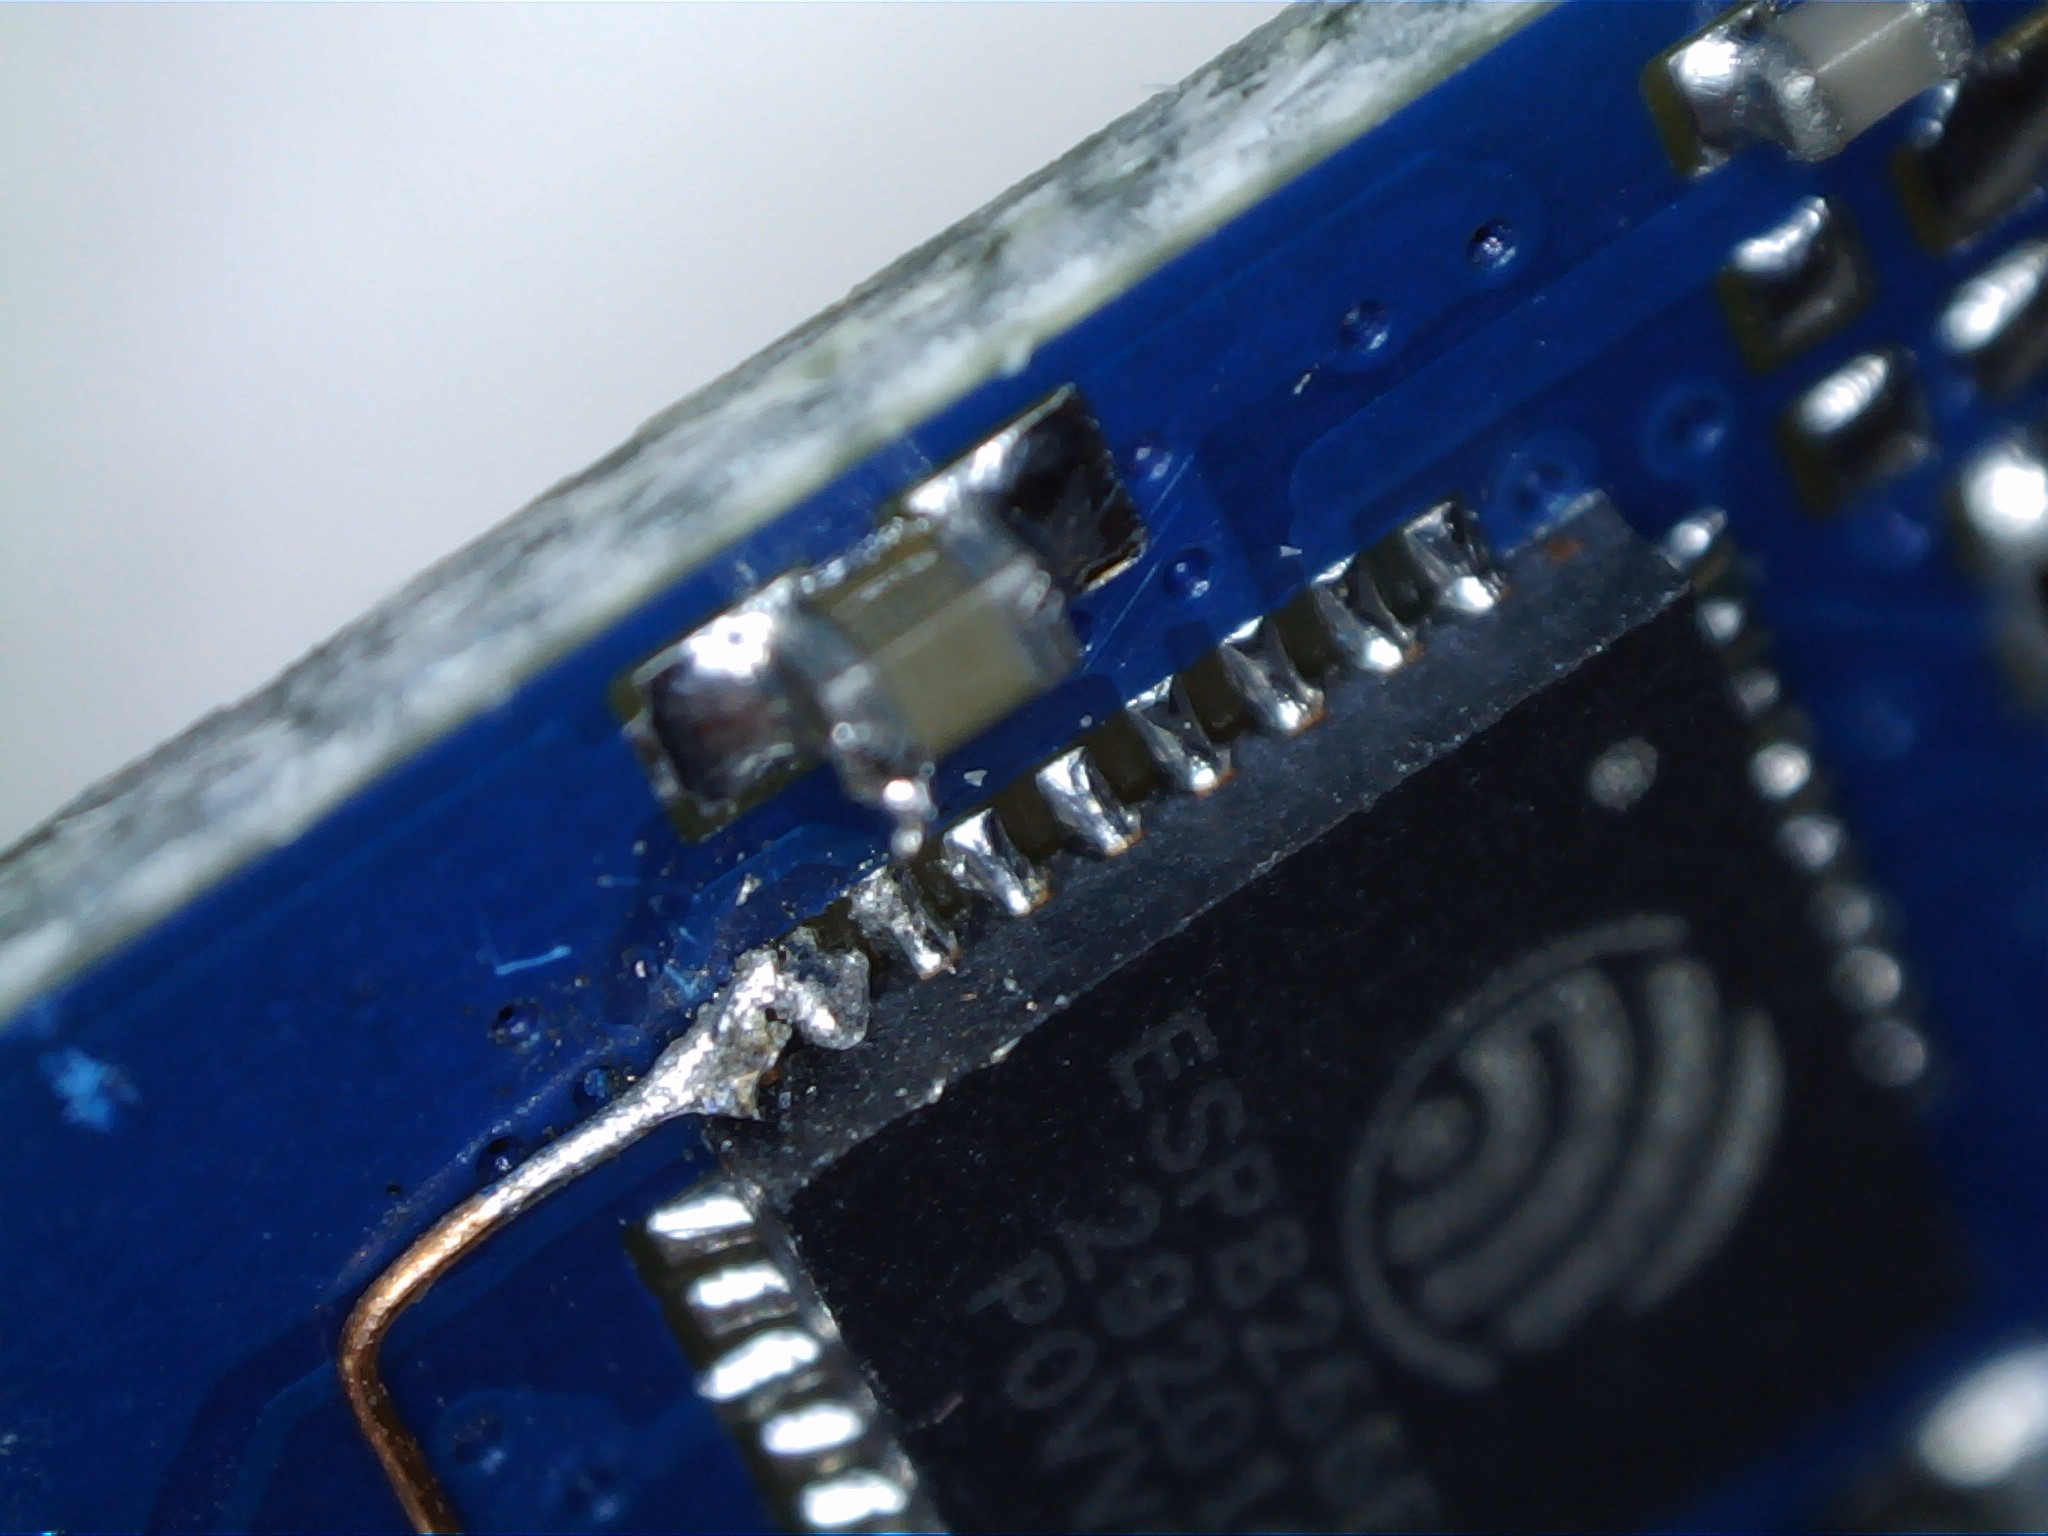
Since the photo above was taken with a microscope, here’s another shot with the ESP-01, the copper wire I took the above strand from, and a Lightning connector for scale:

Soldering that wire (twice) was one of the trickiest things I ever did with the naked eye, because it’s almost impossible to hold everything in place under the large magnifying glass I have and it’s all too easy to short-circuit multiple pins or inadvertently pull on the wire and wrench out the XPD_DCDC pin after you’ve soldered the wire–which is exactly what happened on one board.
Once you manage to do so, however, a drop of varnish will hold everything safely in place.
Epilogue
There were a few other side-tracks and detours along the way (including some lenghty testing with NodeMCU, which I intend to use again with beefier hardware), but all the code (such as it is) is now up on GitHub, and as far as I know this is the smallest Azure IoT Hub client in the world–for now.
I’ve been running one of these successfully off two AAA batteries for a couple of weeks (with negligible drain, at 15 minute sampling intervals), but there is an added optimization I intend to do, which is to poll the sensor before enabling Wi-Fi–the gains won’t be dramatic, but it bugs me to know I’m bleeding power through RF during the milliseconds it takes for the DHT-11 to stabilize.
However, removing the LEDs (at least the power one, which is always on) is much more likely to matter in terms of power consumption, so I’ll be trying that out once I have a few more sensors running.
I have a few more ESP-01s on the way (as well as a set of decent magnifying glasses), so there will be plenty of fun in the weekends ahead–provided I can eventually stop working on weekends, that is.
Update (November 17th)
In the meantime, I received the new microcontrollers–but, as it turns out, they’re an updated model, the ESP-01S. The good news is that I now have a full megabyte of flash to play with (and can run NodeMCU with all the trimmings), but the bad news is that they have a few added components that make it a lot harder to solder a wire to the XPD_DCDC pin:
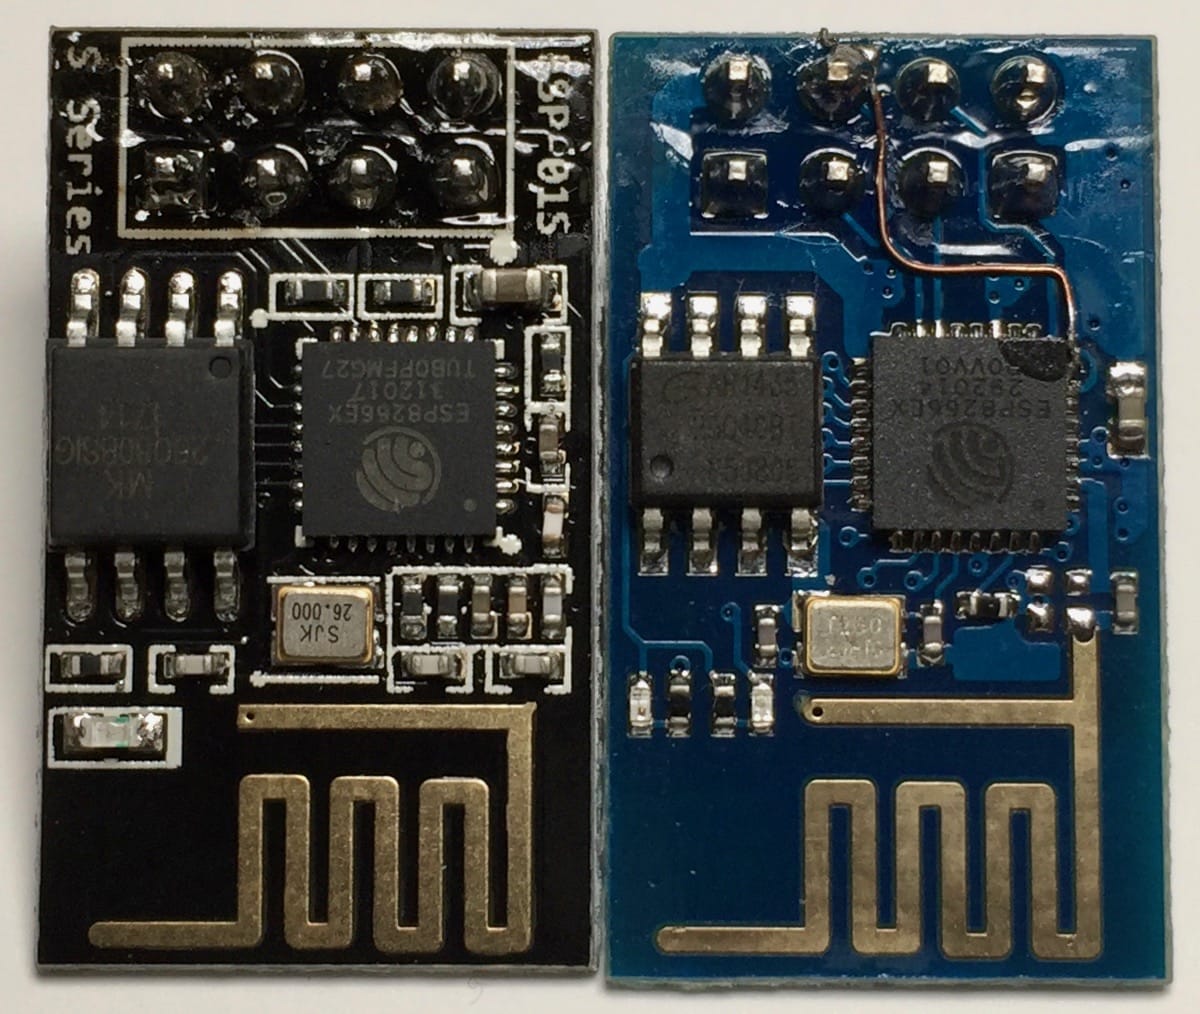
I’m going to make an attempt anyway (if only for the challenge), but if you’re looking to reproduce this, make sure to search for the blue ESP-01 model, which is what I started out with in the first place.